4ipnet Wireless Smart Device Server Setup Part 1.
Terminal Configuration is a list of serial-to-Ethernet devices that communicate with the system only; never get online and no need to go through authentication.
SDS200W is an innovative product 4ipnet offers to facilitate the communication between 4ipnet hotspot gateway and serial POS printer. It is mainly used to have the connected printer fast-print necessary account information extracted from a 4ipnet hotspot gateway for a user who would like to access the Internet or managed networks, making provisioning of wired or wireless connection easier and more user-friendly. What is noteworthy is that, SDS200W supports wireless connectivity to the uplink gateway. That is, operators now can deploy a network with lesser physical wires.
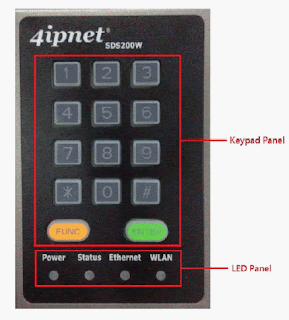
Keypad Panel Overview
Useful Shortcut Keys
There are four LED indicators on the panel : Power, Status, LAN, and WLAN from left to right. Below summarizes all indication types in different states:
Right Side Panel Overview
1. Put the devices in place.
2. Attach a SDS200W to a power adaptor provided in the package.
3. Attach a POS printer to a power adaptor provided in the package and turn on the power switch situated on the left side of the device.
4. Connect a POS printer to the Console port of SDS200W by a RS-232 cable provided within the POS printer package.
5. Connect SDS200W to your 4ipnet Gateway/Controller via Ethernet port.
SDS200W is an innovative product 4ipnet offers to facilitate the communication between 4ipnet hotspot gateway and serial POS printer. It is mainly used to have the connected printer fast-print necessary account information extracted from a 4ipnet hotspot gateway for a user who would like to access the Internet or managed networks, making provisioning of wired or wireless connection easier and more user-friendly. What is noteworthy is that, SDS200W supports wireless connectivity to the uplink gateway. That is, operators now can deploy a network with lesser physical wires.
Keypad Panel Overview
Useful Shortcut Keys
LED Indicators
Understanding the LED indicators
There are four LED indicators on the panel : Power, Status, LAN, and WLAN from left to right. Below summarizes all indication types in different states:
Right Side Panel Overview
Left Side Panel Overview
Including SDS200W into Your Network
The following diagram illustrates a deployment example that shows how the SDS200W can be connected to the POS printer and the 4ipnet Gateway/Controller.
The following diagram illustrates a deployment example that shows how the SDS200W can be connected to the POS printer and the 4ipnet Gateway/Controller.
1. Put the devices in place.
2. Attach a SDS200W to a power adaptor provided in the package.
3. Attach a POS printer to a power adaptor provided in the package and turn on the power switch situated on the left side of the device.
4. Connect a POS printer to the Console port of SDS200W by a RS-232 cable provided within the POS printer package.
5. Connect SDS200W to your 4ipnet Gateway/Controller via Ethernet port.


留言
張貼留言